Introduction
Most pre-school children are fascinated by books, sounds and letters and as parents, we are keen to encourage this. As your child starts their early years education, they will be taught phonics: the journey of learning to read, write and spell. Phonics teaching starts in nursery and continues into pre-school and then school – through Reception and up to the end of Key Stage 1. Supporting your child with phonics at any stage, whether as a toddler, pre-schooler or in Reception, will ignite their learning and give them a head start to enable them to reach their full potential.
However, as a parent, it is difficult to know where to start when it comes to teaching your child phonics. This is why we have designed this website to be progressive; simply follow each section in order (see below). Choose the activities you like (or try all of them) and repeat them as many times as you wish. When teaching something new to your child, repetition is key. When your child is confident, simply move on to the next section. In addition, many of the activities have been designed to be used throughout the different sections; keeping the idea but changing the focus.
Nurseries, pre-schools and schools all use different schemes to support the teaching of phonics but this does not matter when it comes to learning at home. Equipping your child with prior knowledge will be of huge benefit, laying the foundations to enable them to thrive. Most schemes are based on the government’s Letters and Sounds document which outlines a systematic approach (using phases) to teach children phonics. Although it is not a mandatory part of the National Curriculum, it is used in most educational settings, starting with learning about sounds at nursery to becoming fluent readers around age seven.
Finding out about the phases of phonics can be overwhelming to say the least! There is often so much information that is difficult to digest, let alone grasp the meanings of all the technical vocabulary! It is with this in mind that we have written the following ‘Guide to Phonics’ which is in easy to follow sections and uses only the most relevant vocabulary. We recommend that you read the whole section to gain an insight into the progression of phonics, then refer back to each section before starting the corresponding activities.
It is also extremely important to acknowledge that children all develop at different rates (and this is perfectly normal) so every activity on this website can be easily adapted or extended. Work with your child at their own pace and always make it fun!
Guide to Teaching Phonics
By working through our activities in order, we feel that your child will gain a thorough understanding of phonics. We have designed the sections to be easy to use and linked to the phases recommended by the government. This website covers Phases 2 and 3 as these are the areas of focus for toddlers, pre-schoolers and early Reception children. However, the activities have been created to be easily adaptable to use for all phases (including higher levels for older children) so the same idea can be used time and time again, changing the letter sounds or the words. Please be mindful that there is no expected timeframe – a toddler will be working at a very different level to a child in Reception!
We realise that our way may slightly differ to others but we have tried and tested every activity with Jacob and our way works!
For more a more detailed insight into the phases, please see ‘Further Information about the Phases of Phonics’ at the end of this information page.
The order to work through our website is as follows:-
1. Single Letter Sounds
By the end of this section, your child should be able to recognise all of the letters of the alphabet and be able to say their sound. The recommended order to teach the sounds are as follows:
| Phase 2 | |
| Set 1 | s, a, t, i, p, n |
| Set 2 | m, d, g, o, c, k |
| Set 3 | m, d, g, o, c, k |
| Set 4 | h, b, f, l |
| Phase 3 | |
| Set 5 | j, v, w, x, q, y, z |
With Jacob, I started with just two letter sounds (s and a) to begin with and then gradually introduced more when he was ready to move on. The activities in this section are fully adaptable to use with any number of letter sounds.
Although there is much debate on whether to teach lower-case and upper-case letters separately or whether to teach them both together, personally I chose to only teach lower-case at this stage and move on to upper-case later (see the ‘Upper Case Letters’ section for more details)
One of the most common questions that parents ask is how to pronounce the letter sounds correctly. I always suggest that they watch a video online (there are lots on YouTube). I would recommend the following, produced by the Department for Education:-
2. Segmenting and Blending
Once your child is fairly confident with their single letter sounds, they will be ready to start this section and begin to learn to read. There are two stages to early reading – segmenting and blending.
Segmenting is when children break up a word into segments eg. c-a-t = cat. This is also often referred to as ‘sounding out’. Children will do this until they become familiar with a word and are able to read it without segmenting first.
Blending is when children are able to say the sounds quickly together to “read” the word.
At this stage, children will segment and then blend every word. It is worth noting that blending is a harder skill to achieve so this stage can take longer.
Segmenting and blending starts with VC (vowel-consonant) words and CVC (consonant-vowel-consonant) words.
Examples of CV words are – on, it, up, at etc.
Examples of CVC words are – cat, dog, man, bag etc.
Some of the activities in this section involve your child making their own words and it is at this stage that nonsense words are introduced.
Nonsense Words are words which have no meaning but follow regular phonetic rules so can therefore can be decoded (sounded out) eg. “yim”, “lig”, or “bif”. These words are often called non-words, alien words or pseudo words (see the “Further Information about the Phases of Phonics” section for more information about nonsense words).
By the end of this section, your child should be able to segment and blend a variety of CVC words from phases 2 and 3 (both real words and nonsense words). The VC words tend to be high frequency words so I taught these as part of the next section.
3. Tricky Words / High Frequency Words
Once your child is starting to segment and blend, you can move on to introducing tricky words and high frequency words. The activities in this section are fully adaptable to use with these words from any phase.
Tricky Words are words which cannot be sounded out because they are not decodable (able to be sounded out) using phonics alone. Instead they are taught by memory, hence also being referred to as “sight words”. A strategy that you will see in some of my activities is to place a red dot next to any tricky words so that Jacob could see that these were words to just ‘know’ rather than attempting to sound them out.
High Frequency Words are words which are common and appear often in all forms of writing.
Note: Tricky words are also high frequency words as they are commonly used
The recommended order to teach these words is as follows:
| Tricky Words | |
| Phase 2 | Phase 3 |
| I | he |
| no | she |
| the | we |
| to | me |
| go | be |
| into | was |
| you | |
| they | |
| all | |
| are | |
| my | |
| her | |
| High Frequency Words | ||||
| Phase 2 | Phase 3 | |||
| a | but | an | will | my |
| dad | of | as | that | see |
| I* | into* | can | then | too |
| mum | his | off | now | was* |
| big | to* | not | she* | all* |
| it | him | get | this | look |
| at | had | and | with | we* |
| is | in | for | you* | |
| on | no* | he* | her* | |
| up | got | them | be* | |
| back | the* | down | they* | |
| if | go* | me* | are* | |
* = Tricky Words as well
Note: Work down the columns
For the Phase 3 high frequency words, your child will need to know the digraph before they learn the word (see next section explaining digraphs). For example, to be able to read “then”, your child will need to know which sound ‘th’ makes as it cannot be “sounded out”.
These lists are big and can look daunting on first glance, so introduce the words a few at a time, only moving on when your child is ready. The activities can be used time and time again, using different words each time to enable your child to work through at their own pace.
4. Digraphs and Trigraphs
One your child is confident with single letter sounds, they will be ready to move on to digraphs and trigraphs.
Digraphs are two letters that together make a single sound eg. sh and ck.
Trigraphs are three letters that together make a single sound eg. igh and ure.
The recommended order to teach the sounds are as follows:
| Phase 2 |
| ck, ff, ll, ss |
| Phase 3 |
| zz, qu, ch, sh, th, ng, ai, ee, igh, oa, oo*, oo*, ar, or, ur, ow, oi, ear, air, ure, er |
*Note that there are two “oo” digraphs – “oo” as in “moon” and “oo” as in “book”
Digraphs and Trigraphs are far trickier for children than single letter sounds, so introduce them a few at a time, only moving on when your child is ready. The activities on this website can be used over again, using different digraphs and trigraphs each time to enable your child to work through at their own pace.
5. Upper-Case Letters
As I mentioned earlier, there is much debate on whether to teach lower-case and upper-case letters separately or whether to teach them both together. Personally, I chose to only teach lower-case when Jacob was learning single letter sounds and then move on to upper-case separately at a later stage. I have put this section at the bottom as there is no set time to teach this. With Jacob, it was when he was becoming fairly confident with the segmenting and blending activities on this website and just before I gave him his first “reading books” (see the section below for more information about which books I chose) as otherwise, upper-case letters at the start of sentences would have been confusing. This worked well as by this stage Jacob knew all of his lower-case letters so it was just a question of matching them to the upper-case ones.
The following section offers a more detailed insight into the phases of phonics and some suggestions for resources which I have found useful. It is not necessary to read this as our “Guide to Phonics” covers all you need to support your child successfully.
Further Information about the Phases of Phonics
There are 6 phases in the teaching of phonics. designed for up to the age of around seven. As our website focuses primarily on younger children (nursery, pre-school and Reception), this guide will focus on Phases 1-3 with activities based on Phases 2 and 3. However, as our activities are designed to be adaptable, they are also excellent to use in the higher phases as well.
Phase 1
Phase 1 concentrates on developing children’s speaking and listening skills and lays the foundations for the phonics work which starts in Phase 2.
Typical activities in Phase 1 include:-
- Action Songs
- Body percussion (e.g. clapping and stamping)
- Playing instruments
- Rhythm and rhyme
- Alliteration (when words start with the same sound eg. ‘six silly snakes’)
The emphasis during Phase 1 is to get children attuned to the sounds around them and ready to begin developing oral blending and segmenting skills. To practise oral blending, say some sounds eg. ‘c-u-p’ and see whether your child can pick out a cup from a group of objects.
At this stage it is great if your child is familiar with the alphabet, even though it may not hold any meaning. For example, Jacob could sing the whole ‘A B C D’ song but hadn’t made the connection that the ‘A’ which he was singing about was the letter ‘A’ as in his books.
Before I started any of my activities (which are designed for Phase 2 and beyond), I wanted Jacob to have more awareness of the meaning of letters. We read lots of alphabet books and did puzzles, looking at the letters and their shapes. I also had an alphabet poster on the fridge which Jacob would enjoy looking at.
Phase 2
The purpose of this phase is to move children on from oral blending and segmentation to blending and segmenting with letters.
In Phase 2, children learn 19 single letter sounds, 4 digraphs, 6 tricky words and 31 high frequency words (which include the tricky words). Although there is a recommended order to teach these, many children start by learning the letters in their name first.
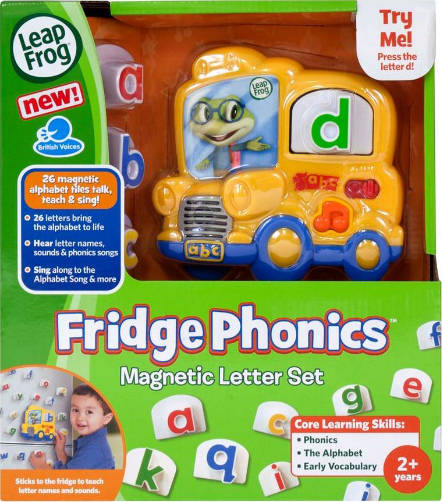
There are many toys designed to promote the learning of letter sounds but for Jacob, the most valuable one was the Leapfrog “Fridge Phonics” bus:-

Placing a letter in the bus plays a song saying both the name of the letter and its sound. Pressing again gives an example of a word starting with that sound. This was a fantastic resource and worked well alongside all of my activities.
Magnetic letters on the fridge are a great learning tool as they help children internalise the shape and feel of letters which supports alphabet fluency – a predictor of future reading success. They can also be used on magnetic drawing boards too. Foam bath letters work in the same way.
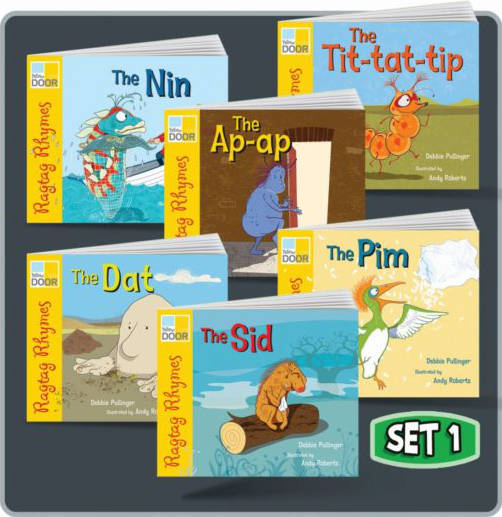
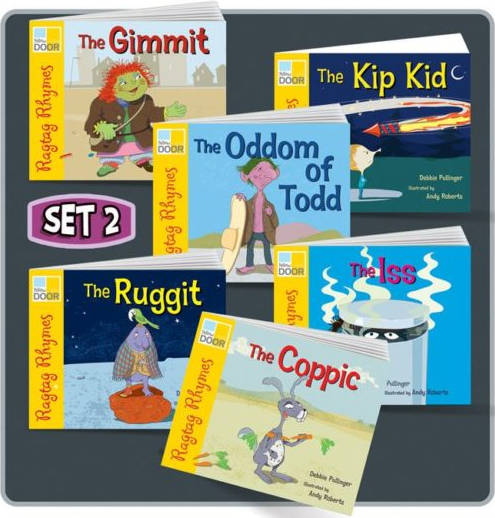
By the end of Phase 2 children should be able to read some vowel-consonant (VC) and consonant-vowel-consonant (CVC) words which is the first stage to reading. It was when Jacob had reached the end of this phase through completing the activities on the website that I introduced his first ‘reading book’ which was a very exciting time! As a teacher, I am familiar with many different reading schemes and programmes but personally I love ‘Ragtime Rhymes’ (sets 1 and 2) by Yellow Door. The reason that I am such an advocate is because the books only include words which are decodable using the phonic knowledge acquired in Phase 2. As Jacob had worked through the activities on this website, he was confident with blending and segmenting and could also read the tricky words. Therefore, with a bit of help, he was able to read every single word in the books which was a great way to consolidate his learning and also gave him a real sense of achievement (and a very proud mummy!)


As the Ragtime Rhymes literature explains, these books are not a reading scheme or a phonics programme but a set of high-quality real picture books which is why Jacob enjoyed them so much. The set also comes with a teacher’s guide which offers some great suggestions for discussing the story and also provides follow up activities. They are also great for exploring nonsense words through the names of the characters.
There is lots of research that the teaching of nonsense words helps with progress in phonics as they assess phonics skills in isolation without memory as a support. They are used in schools for this reason. Nonsense words should always be taught after real words and should be created using letter sounds that your child is already familiar with.
Phase 3
By the time they reach Phase 3, children will already be able to read words containing the single letter sounds and digraphs taught in Phase 2 as well as the tricky words and high frequency words from the phase.
Phase 3 continues to build on this knowledge by introducing the remaining 6 single letter sounds and 17 more digraphs. This phase also presents trigraphs (4 of them) for the first time. Children will learn 12 new tricky words and 24 new high frequency words (which include the tricky words). Children also continue to practise blending and segmenting in this phase and will therefore greatly widen their reading ability.
Glossary of Other Terms
As well as developing phonics, many of our activities provide perfect opportunities to practise and refine other skills as well. These skills are written in coloured italics throughout the activities and are defined here:-
Fine Motor Skills – Are achieved when children learn to use their smaller muscles, for example in their hands, fingers and wrists. Children use their fine motor skills when writing, buttoning clothing, cutting with scissors etc. This skill requires precision and co-ordination.
Gross Motor Skills – Utilize larger muscle groups and control every day actions such as throwing and kicking as well as walking and jumping etc. They require less precision than fine motor skills.
Letter Formation – The ability to write letters correctly.

